
Shell Integration
iTerm2 may be integrated with the unix shell so that it can keep track of your command history, current working directory, host name, and more--even over ssh. This enables several useful features.
Shell integration is compatible with bash, fish (2.3 and later), tcsh, xonsh (iTerm2 3.6.10 and later), and zsh.
How To Enable Shell Integration
This section describes the four ways to enable shell integration:
- Load it automatically.
- Use the Install Shell Integration menu item.
- Install it by hand.
- Configure triggers appropriately.
Load Automatically
In iTerm2 version 3.5 and later you can enable shell integration by enabling Load shell integration automatically in Settings > Profiles > General in the Command section. This is available if your Command is set to SSH or if it's set to Login Shell and your shell is supported.
Install Shell Integration Menu Item
To modify your shell's dotfiles to load shell integration, you can select the menu item iTerm2 > Install Shell Integration. You'll first be asked whether you wish to install the Utilities. Utilities consist of a number of shell scripts that provide useful functionality, such as displaying inline images, performing file transfer, or customizing the display.
Next you can choose to download and run an installer or to do an internet-free install.
The download-and-run option will type this command for you:
curl -L https://iterm2.com/shell_integration/install_shell_integration.sh | bash
Alternately, select Internet-Free Install. This runs a sequence of commands to determine your shell, install files, and modify your dotfiles to load shell integration automatically.
Install By Hand
If you prefer to have control over the process of modifying your environment, you can manually install shell integration by creating files and editing your shell's configuration. Select your shell to see the appropriate instructions:
bash | fish | tcsh | xonsh | zsh
curl -L https://iterm2.com/shell_integration/bash \
-o ~/.iterm2_shell_integration.bash
Next, you need to load the script at login time. You need to add the following command to ~/.bash_profile or ~/.profile. If you already have .profile then add it there, otherwise add it to .bash_profile. Put it at the end because other scripts may overwrite the settings it needs, such as `PROMPT_COMMAND`.
source ~/.iterm2_shell_integration.bash
Triggers
Installing a login script on every host you connect to is not always an option. To be sure, modifying root's login script is usually a bad idea. In these cases you can get the benefits of shell integration by defining triggers. The following triggers are of interest:
- Report User & Host
- Report Directory
- Prompt Detected
Use these triggers to tell iTerm2 your current username, hostname, directory, and the location of the shell prompt. Suppose you have a shell prompt that looks like this:
[email protected]:/home/george%
It exposes the username, hostname, and working directory. We can harvest those with a regular expression. First, define a trigger with this regex:
^(\w+)@([\w.]+):.+%
It captures the username and hostname from the example prompt above. Select the action "Report User & Host". Set the trigger's parameter to:
\1@\2
Then create another trigger with the action Report Directory. This regular expression will extract the directory from the example prompt:
^\w+@[\w.]+:([^%]+)%
Set this trigger's parameter to
\1
Make sure both triggers have their Instant checkbox enabled so they'll take effect before a newline is received.
Finally, add a regular expression that matches the start of your prompt and give the "Prompt Detected" action. This causes a "mark" to be added, which is a blue triangle visible to the left of this line (or a horizontal line above, if Auto Composer is enabled).
You may specify a user name or host name alone to Report Host & User. If you give just a user name then the previous host name will be preserved; if you give just a host name then the previous user name will be preserved. To change the user name only, give a parameter like user@. To change the host name only, give a parameter like example.com.
Features
Shell Integration enables numerous features:
Marks
These are saved locations in history. They make it easy to navigate to previous shell prompts or other locations of interest.
Select Output of Last Command
The menu item under Edit selects the output of the last-run command.
Alert when current command finishes running.
iTerm2 will present a modal alert when a long-running command finishes, if you ask it to.
View information about commands.
You can see the return status code, working directory, running time, and more for shell commands entered at the prompt in the past.
Download files from remote hosts with a click.
You can right click on a filename (e.g., in the output of ls) to download it.
Drag-drop files to upload with scp.
Hold down option and drag-drop a file from Finder into iTerm2 to upload it.
View command history.
It can be seen and searched in the toolbelt or quickly accessed in a popup window.
Easy access to recently and frequently used directories.
iTerm2 remembers the directories you use, sorting them by "frecency" (frequency and recency of use) and giving you access to them in the toolbelt and in a popup window.
Assign profiles to hostnames, usernames, or username+hostname combinations.
Sessions will automatically switch profiles as you log in and out according to rules you define.
Ensures the command prompt always starts at the left column, even when the last command didn't end in a newline.
Each of these features are described in more detail below.
Offscreen Command Line
When part of a command's output is scrolled off the top of the screen, the originating prompt is shown there.
Auto Composer
Auto Composer replaces your shell's prompt with a macOS-native text view that uses native editing conventions.
Command Selection
Click on a command to select it; then Find, Filter, and Select All will be restricted to that command's output.
How it works
Shell Integration works by configuring your shell on each host you log into to send special escape codes that convey the following information:
- Where the command prompt begins and ends.
- Where a command entered at the command prompt ends and its output begins.
- The return code of the last-run command.
- Your username.
- The current host name.
- The current directory.
How to use it
Marks
When shell integration is enabled, iTerm2 automatically adds a mark at each command prompt. Marks are indicated visually by a small blue triangle in the left margin.

You can navigate marks with Cmd-Shift-Up and Down-arrow keys.
If you have a multi-line prompt and would like to customize the mark's location, add this to your PS1 at the location where the mark should appear:
For zsh:
%{$(iterm2_prompt_mark)%}
For bash:
\[$(iterm2_prompt_mark)\]
Fish users can place this line somewhere in their fish_prompt function:
iterm2_prompt_mark
Xonsh users can put marks to PROMPT in xonsh RC file explicitly:
$PROMPT = '{iterm2_prompt_start}' + $PROMPT + '{iterm2_prompt_end}'
This feature is not supported in tcsh.
For zsh and bash users: if you are unable to modify PS1 directly (for example, if you use a zsh theme that wants to control PS1), you must take an extra step. Add export ITERM2_SQUELCH_MARK=1 before the shell integration script is sourced. Add the iterm2_prompt_mark as directed above to your prompt through those means available to you.
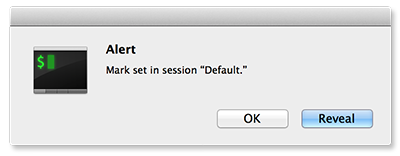
Alert on next mark
iTerm2 can show an alert box when a mark appears. This is useful when you start a long-running command. Select Edit>Marks and Annotations>Alert on next mark (Cmd-Opt-A) after starting a command, and you can go do something else in another window or tab. When the command prompt returns, a modal alert will appear, calling attention to the finished job.
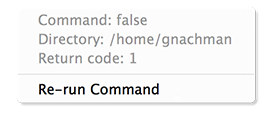
Command status
The mark on a command line will turn red if a command fails. You can right click the mark to view its return code.
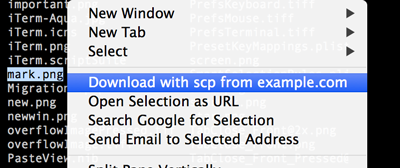
Download with scp
You can right-click on a filename (e.g., in the output of ls) and select Download with scp from hostname, and iTerm2 will download the file for you.
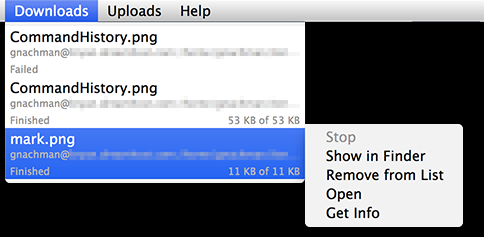
A new menu bar item will be added called Downloads that lets you view downloaded files and track their progress.
Upload with scp
If you drop a file (e.g., from Finder) into iTerm2 while holding the option key, iTerm2 will offer to upload the file via scp to the remote host into the directory you were in on the line you dropped the file on. A new menu bar item will be added called Uploads that lets you view uploaded files and track their progress.
Command history
With shell integration, iTerm2 can track your command history. The command history is stored separately for each username+hostname combination. There are four places where this is exposed in the UI:
Command history popup
You can view and search the command history with Session>Open Command History... (Shift-Cmd-;).
Autocomplete
Commands in command history are also added to Autocomplete (Cmd-;). If Settings>General>Save copy/paste history and command history to disk is enabled, then command history will be preserved across runs of iTerm2 (up to 200 commands per user/hostname).
Toolbelt
A command history tool may be added to the toolbelt by selecting Toolbelt>Command History.
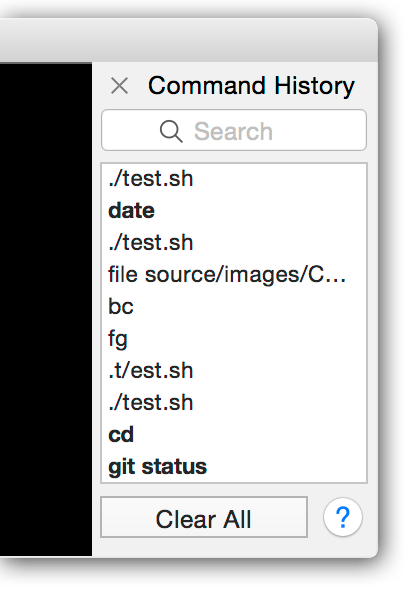
Bold commands are from the current session. Clicking on one will scroll to reveal it. Double-clicking enters the command for you. Option-double-clicking will output a "cd" command to go to the directory you were in when it was last run.
Command Completion
iTerm2 will present command completion suggestions automatically when View>Auto Command Completion is selected.
Recent Directories
With shell integration, iTerm2 will remember which directories you have used recently. The list of preferred directories is stored separately for each username+hostname combination. It is sorted by "frecency". There are two places it is exposed in the UI:
Recent Directories popup
You can view and search your recently and frequently used directories in Session>Open Recent Directories... (Cmd-Opt-/).
Toolbelt
A Recent Directories tool may be added to the toolbelt by selecting Toolbelt>Recent Directories.
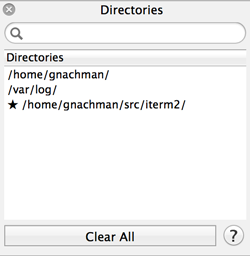
Double-clicking a directory will type its path for you into the current terminal. Option-double-click will enter a "cd" command for you. You can also right-click on a directory to toggle its "starred" status. A starred directory will always appear at the bottom of the list so it is easy to find.
Automatic Profile Switching
Please see the documentation at Automatic Profile Switching.
Shell Integration for root
If you'd like to be able to use shell integration as root, you have two
options. The first option, presuming you use bash, is to become root with sudo
-s (which loads your .bashrc as root) and add this to your .bashrc:
test $(whoami) == root && source "${HOME}/.iterm2_shell_integration.bash"
The alternative is to use Triggers to emulate shell integration as described above.
Limitations
By default, shell Integration does not work with tmux or screen. If you'd like to use it with tmux, add this to your login script prior to loading shell integration:
export ITERM_ENABLE_SHELL_INTEGRATION_WITH_TMUX=1
It works well with tmux integration (tmux -CC) but not with the regular tmux UI.
A Note on SCP
iTerm2 can do uploads and downloads with scp as described above. There are a few things you should know.
iTerm2 links in libssh2, and does not shell out to scp. It respects /etc/known_hosts and ~/.ssh/known_hosts, and will update the latter file appropriately. Host fingerprints are verified. Password, keyboard-interactive, and public-key authentication are supported. Private keys by default come from ~/.ssh/id_rsa, id_dsa, id_ed25519, or id_ecdsa, and may be encrypted with an optional passphrase.
iTerm2 respects ssh_config files, but only a subset of the commands are understood:
- Host
- HostName
- User
- Port
- IdentityFile
Settings pulled from ssh_config override the hostname and user name provided by shell integration. The shell integration-provided host name is used as the text against which Host patterns are matched.
The following files are parsed as ssh_config files, in order of priority:
- ~/Library/Application Support/iTerm/ssh_config
- ~/.ssh/config
- /etc/ssh_config
If you have trouble, see SCP Not Connecting on the wiki.
If you use SSH Integration then file transfer happens over the SSH Integration framing protocol rather than by using scp. This is generally more reliable because it doesn't require opening a new connection.